Introduction
In today’s digital era, seamless data integration and efficient file management are critical for business productivity. Microsoft SharePoint and Power Pages (previously known as Power Apps Portals) are two powerful tools that many organizations use to manage and present their data. SharePoint offers a robust platform for document management and collaboration, while Power Pages allows for the creation of external-facing websites and portals.
One common need is to enable users to download files stored in SharePoint directly from a Power Pages portal. This capability can streamline workflows, enhance user experience, and ensure that crucial documents are easily accessible to stakeholders. In this article, we will walk you through the process of setting up your Power Pages portal to facilitate the downloading of files from a SharePoint document library. We will cover the necessary configurations, permissions, and steps to ensure a smooth and secure file download process.
By the end of this guide, you will be able to integrate SharePoint with Power Pages effectively, providing your users with direct access to important documents right from your portal. Let’s dive in!
SharePoint Integration
Microsoft SharePoint is a web-based platform primarily used for collaboration, document management, and storage. It enables organizations to create, manage, and share content seamlessly across teams and departments. SharePoint provides features like intranet portals, file sharing, content management, and enterprise search, making it a versatile tool for enhancing organizational productivity and communication.
For detailed guidance on integrating SharePoint with Dynamics 365, you can refer to the official Microsoft documentation here.
Note: First you have to save the target file SharePoint destination link in your record, and then you have to create Microsoft Flow which will use this stored link and return it’s content from the SharePoint.
First create the Flow
Power Automate cloud flow allows users to create automated workflows between different applications and services. You can use a Power Automate cloud flow to create logic that performs one or more tasks when an event occurs. For example, configure a button so that when a user selects it, send an email or meeting request, update a record, collect data, synchronize files, and other tasks.
Now, you can securely invoke Power Automate cloud flows from Power Pages to interact with 1000+ external data sources and integrate it into your business site.

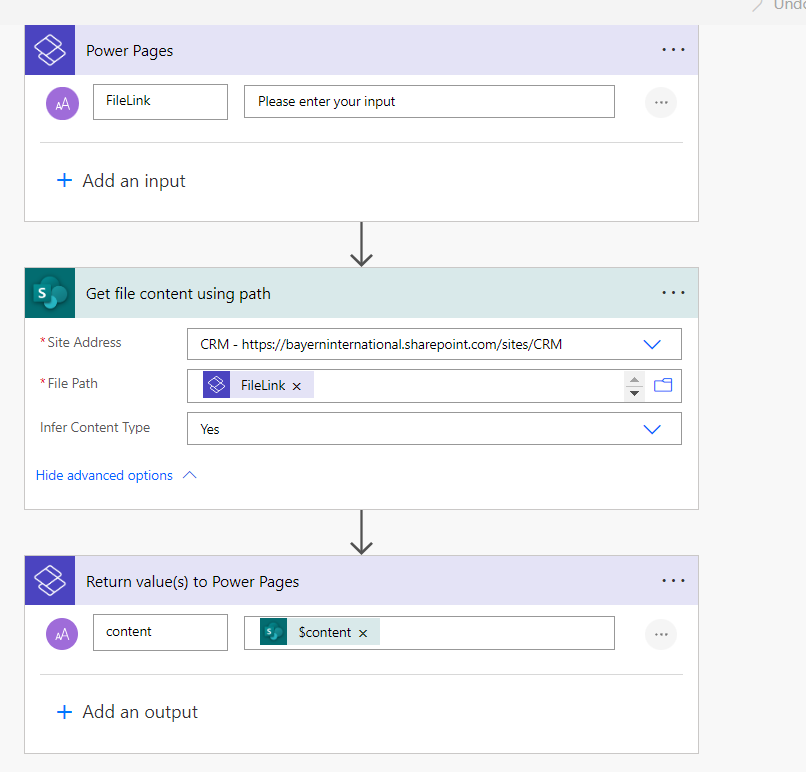
Power Pages Trigger :
Get File Content Using Path
Return File content
Power Pages
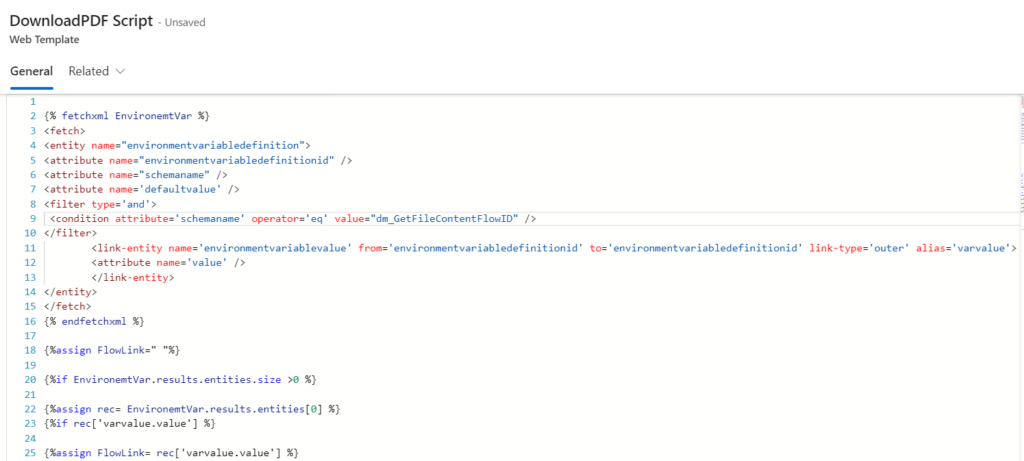
Go the Power Pages “Power Management” and create Web Template with below code , this code call first the environment variable which has the our Flow url

{% fetchxml EnvironemtVar %}
<fetch>
<entity name="environmentvariabledefinition">
<attribute name="environmentvariabledefinitionid" />
<attribute name="schemaname" />
<attribute name='defaultvalue' />
<filter type='and'>
 <condition attribute='schemaname' operator='eq' value="dm_GetFileContentFlowID" />
</filter>
<link-entity name='environmentvariablevalue' from='environmentvariabledefinitionid' to='environmentvariabledefinitionid' link-type='outer' alias='varvalue'>
<attribute name='value' />
</link-entity>
</entity>
</fetch>
{% endfetchxml %}
{%assign FlowLink=" "%}
{%if EnvironemtVar.results.entities.size >0 %}
{%assign rec= EnvironemtVar.results.entities[0] %}
{%if rec['varvalue.value'] %}
{%assign FlowLink= rec['varvalue.value'] %}
{%elsif rec['defaultvalue'] %}
{%assign FlowLink= rec['defaultvalue'] %}
{%endif%}
{%endif%}
<script>
    function CallSPFlow(fileLink){
      var data = {};
       data["FileLink"] = fileLink;
       var payload = {};
                  payload.eventData = JSON.stringify(data);
                  shell.ajaxSafePost({
                          type: "POST",
                          contentType: "application/json",
                          url: "{{FlowLink}}",
                          data: JSON.stringify(payload),
                          processData: true,
                          global: true,
                      }).done(function (response) {
                          const result = JSON.parse(response);
                          var fileContent = result["content"];
                       //  console.log(fileContent);
// Create a Blob object to store the file content
var bytes = Uint8Array.from(atob(fileContent), c => c.charCodeAt(0));
var blob = new Blob([bytes], {type: 'application/pdf' || 'application/octet-stream' || 'text/plain'});
// Create a temporary URL for the Blob
var url = window.URL.createObjectURL(blob);
var downloadLink = document.createElement('a');
// Set the href attribute of the download link to the temporary URL
downloadLink.href = url;
// Set the download attribute to specify the file name
var linkArr = fileLink.split("/");
downloadLink.download = linkArr[linkArr.length-1];
// Append the download link to the document body
document.body.appendChild(downloadLink);
// Trigger the click event of the download link
downloadLink.click();
// Clean up resources after the download link is clicked
window.URL.revokeObjectURL(url);
// Remove the download link from the document body
document.body.removeChild(downloadLink);
                   }).fail(function (e) {
                          console.log(e);
                      });}
</script>
In you page or other web template or Entity List where you need to have the Download button , you need to include the “DownloadPDF Script” Template
{%include ‘DownloadPDF Script’ %}
On your Button add the “CallSPFlow” to the onclick function
<a class="btn" onclick="CallSPFlow('{{FileLink}}')">Download</a>